A leather jacket passes through two distinct industrial phases before it reaches the buyer: the tannery phase, where raw animal hides are transformed into finished leather, and the factory phase, where that leather is cut, assembled, and quality-checked into a wearable garment. Most guides cover only the factory work. This one covers both, because understanding the full chain is what separates an informed buyer from one who gets caught out by quality problems they cannot diagnose.
We have been manufacturing leather jackets in Karachi for over 25 years. Our facility sits within the Korangi industrial cluster, where around 250 tanneries operate, so we see both sides of this process daily. Below is the complete production sequence as it actually happens, with real timelines and the details that matter to anyone sourcing jackets at scale.
How do raw hides become finished leather?

The leather that arrives at our cutting table has already been through weeks of chemical and mechanical processing at the tannery. This phase is invisible to most buyers, but it determines the quality ceiling of the finished jacket. No amount of skilled stitching can compensate for poorly tanned leather.
Step 1: Hide selection and preservation
It begins at the abattoir. Raw hides are removed from the animal and must be preserved within hours to prevent bacterial degradation. The standard method is wet salting: layers of sodium chloride are applied to the flesh side of the hide, drawing out moisture and halting decomposition. Salted hides can be stored and transported for weeks before reaching the tannery.
Hide quality varies significantly. Factors include the breed of animal, its age, diet, climate exposure, and how it was handled during its life. Insect bites, barbed wire scratches, brand marks, and disease scars all reduce the usable area of a hide. Our tannery partners grade hides before purchasing: Grade A hides have minimal surface defects and command a premium, while lower grades are used for less visible applications or corrected-grain finishes.
Step 2: Beamhouse operations
Before tanning can begin, the preserved hide must be cleaned and prepared through a series of steps collectively called beamhouse operations:
- Soaking: Hides are rehydrated in water to restore their original moisture content and remove salt, dirt, and blood. This takes 8 to 24 hours.
- Liming: Hides are treated with calcium hydroxide (lime) to swell the fibres, loosen the hair, and remove the epidermis. This process takes 1 to 3 days.
- Unhairing and fleshing: Mechanical removal of hair from the grain side and fat from the flesh side. This is done on specialised machines that scrape the hide without damaging the grain layer.
- Deliming and bating: Chemical neutralisation of the lime, followed by enzymatic treatment to soften the fibres and prepare them for tanning. This takes several hours.
- Pickling: The hide is treated with acid and salt to lower the pH, which prepares the collagen fibres to accept tanning agents.
At this point the hide is called a “pelt” and is ready for the tanning process itself.
Step 3: Tanning
Tanning is the chemical process that converts perishable raw hide into stable, durable leather. The vast majority of garment leather, approximately 80 to 85% worldwide, is chrome-tanned.
Chrome tanning uses chromium(III) sulphate salts. The pelt is placed in a rotating drum with the tanning solution for 8 to 24 hours. The chromium molecules cross-link with the collagen fibres, making them resistant to heat, water, and bacterial decomposition. Chrome-tanned leather has a characteristic blue-grey colour at this stage (called “wet blue”) and is soft, supple, and suitable for garment use.
The alternative, vegetable tanning, uses plant-derived tannins from bark, wood, or fruit. It takes 30 to 60 days and produces firmer, less elastic leather that is better suited to belts, bags, and saddlery than to jackets.
Step 4: Post-tanning, dyeing, and finishing
Chrome-tanned leather in its “wet blue” state is not yet ready for use. It must go through several more processes:
- Splitting: If the hide is too thick, it is split to the desired thickness using a band knife machine. Garment-weight sheepskin is typically split to 0.6 to 1.0 mm.
- Shaving: Fine-tuning the thickness to achieve uniform gauge across the entire hide.
- Retanning: A second, lighter tanning step that modifies the feel and performance of the leather (adding softness, fullness, or specific handling characteristics).
- Dyeing: Aniline dyes or pigments are applied in rotating drums. Drum dyeing penetrates the full thickness of the leather (through-dyed), while surface dyeing or spray application colours only the grain side.
- Fatliquoring: Oils and fats are introduced into the leather to restore lubrication between the fibres, which would otherwise dry out and become stiff after tanning.
- Drying: Leather is dried using vacuum tables, toggle frames, or hanging methods. Drying must be controlled carefully; too fast and the leather becomes hard, too slow and it can develop mould.
- Finishing: The grain surface is treated with coatings, sprays, or mechanical processes to achieve the desired appearance. Options include aniline (transparent, shows natural grain), semi-aniline (light pigment coating for consistency), or pigmented (heavier coating that masks imperfections). Mechanical finishing processes include ironing, embossing, buffing, or tumbling to alter the surface texture.
The total tannery timeline from raw hide to finished leather is typically 2 to 6 weeks, depending on the tanning method, the complexity of the finish, and the tannery’s production schedule.
How does finished leather become a jacket?
With finished leather in hand, the factory phase begins. This is the work we do at Mac Leather, and every step requires specialised skill that takes years to develop.
Step 5: Design and tech pack
Every jacket starts with a specification. The buyer may provide a detailed tech pack (front/back/side views, measurements, material callouts, hardware details, branding placement) or a reference image that our design team develops into a production-ready document. A typical tech pack includes:
- Flat sketches with construction details
- Full size chart with measurements in centimetres
- Leather type, colour, and thickness specification
- Lining material and colour
- Hardware details: zipper brand, size, colour; snap type; button style
- Stitch type and thread colour
- Label and branding placement
If the buyer does not have a tech pack, we build one collaboratively. This is standard practice for our custom jacket programme.
Step 6: Pattern making and grading
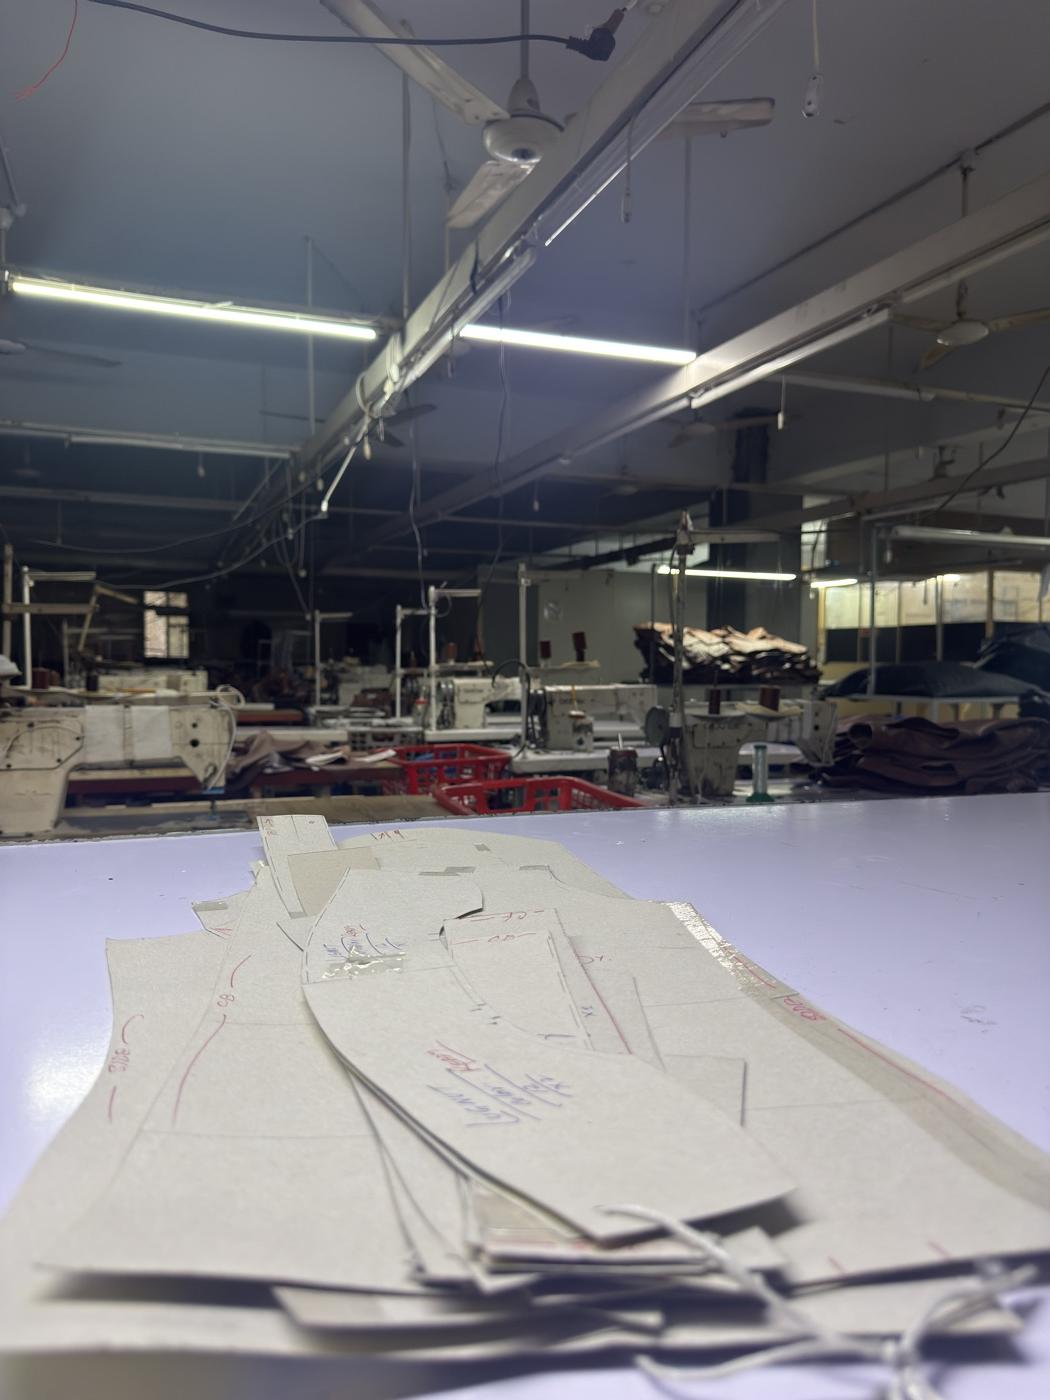
A master pattern maker creates flat pattern pieces for every panel of the jacket. A typical leather jacket has 15 to 30 individual pattern pieces: front panels, back panel, sleeves, collar, pocket bags, facings, belt loops, and various small components.
Pattern making for leather differs from woven fabric. Leather does not stretch uniformly in all directions (it has a directional grain), seam allowances behave differently because the material does not fray, and the thickness of the leather at seam overlaps must be accounted for in the pattern geometry.
Once the base pattern is established in the sample size (typically Medium), it is graded up and down across the full size range. Precision matters: even a 2 mm error at one seam compounds across the garment and produces a jacket that does not hang correctly.
Step 7: Leather inspection and sorting
Each hide is inspected by hand on a light table before cutting begins. Inspectors mark defects, including scars, insect damage, thin spots, uneven dyeing, and stretch marks, with chalk or stickers so the cutter can avoid these areas. Hides are then sorted by colour consistency, because natural leather varies in shade from hide to hide, and panels within a single jacket must match.
Step 8: Cutting
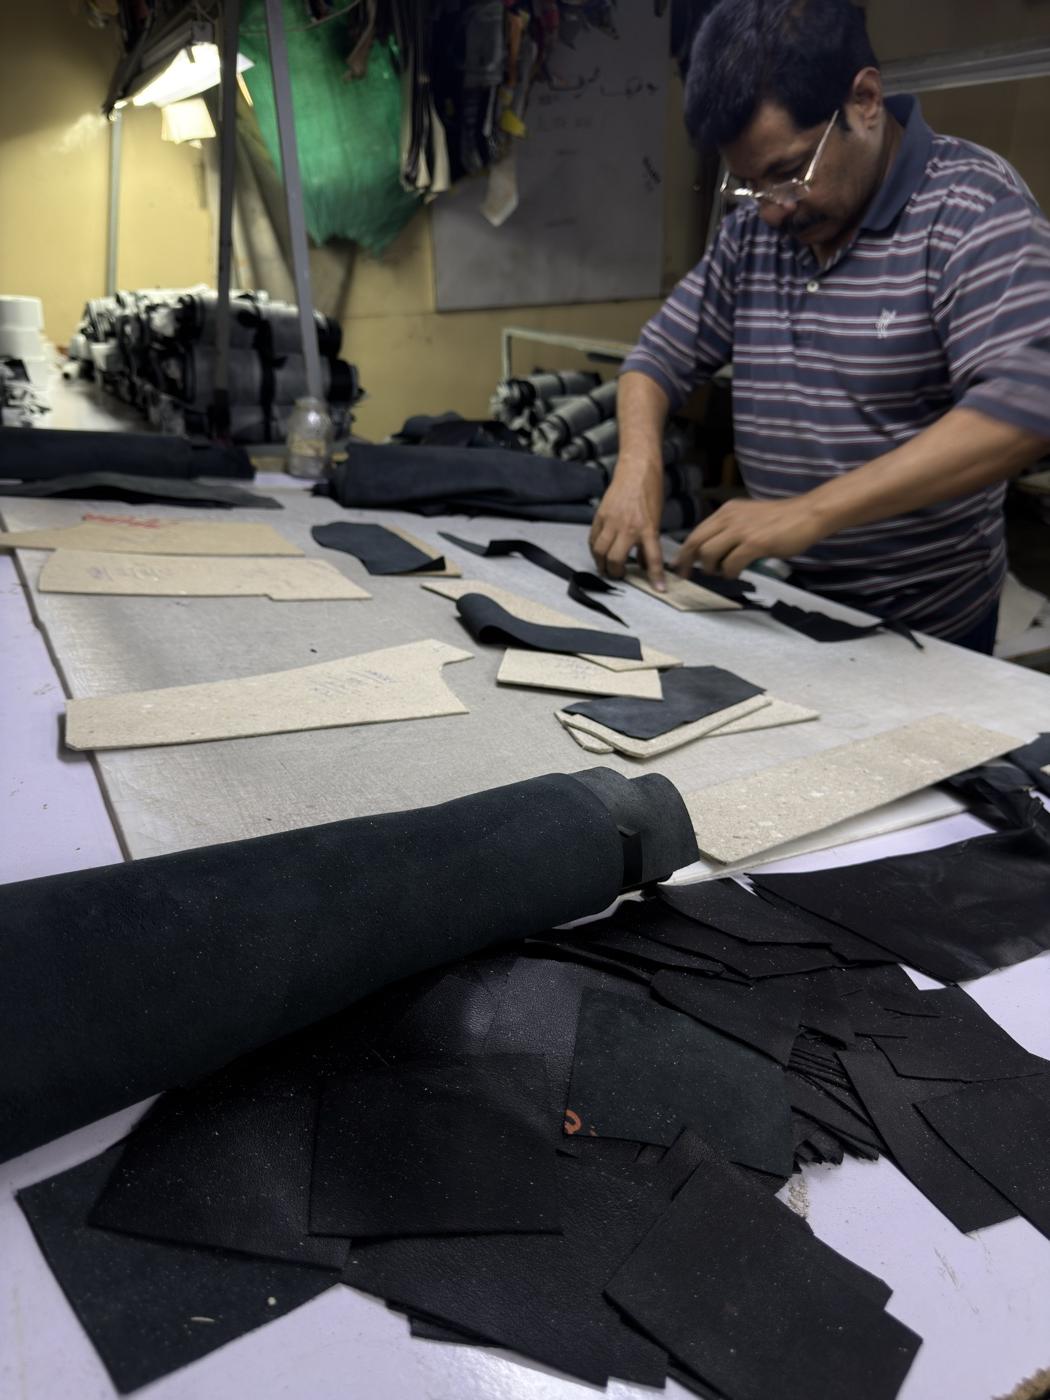
Leather cannot be stacked and cut in bulk the way woven fabric can. Each hide is laid out individually, and the cutter positions pattern pieces to maximise yield while avoiding marked defects. This is one of the most skill-intensive steps in the entire process.
An experienced leather cutter knows that the back and shoulder of the hide (the “butt” and “bend”) have the tightest grain and highest quality, while the belly and legs are softer, more prone to stretching, and less consistent. Premium panels, specifically the jacket front and sleeves, are always cut from the best sections.
Cutting methods we use:
- Hand cutting: A skilled craftsman uses a sharp knife against metal pattern templates. Provides the highest flexibility and is used for small to medium production runs.
- Die cutting (clicking): Metal dies shaped to each pattern piece are pressed through the leather using a hydraulic press. Used for larger runs where consistency and speed are important.
Step 9: Skiving
Before assembly, edges of leather pieces that will overlap at seams are thinned down on a skiving machine. This prevents bulky, raised seams where multiple layers of leather converge, such as at the collar, cuffs, pocket openings, and placket. Proper skiving is one of the clearest indicators of manufacturing quality. Poorly skived seams look puffy and amateurish; well-skived seams lie flat and clean.
Step 10: Stitching and assembly
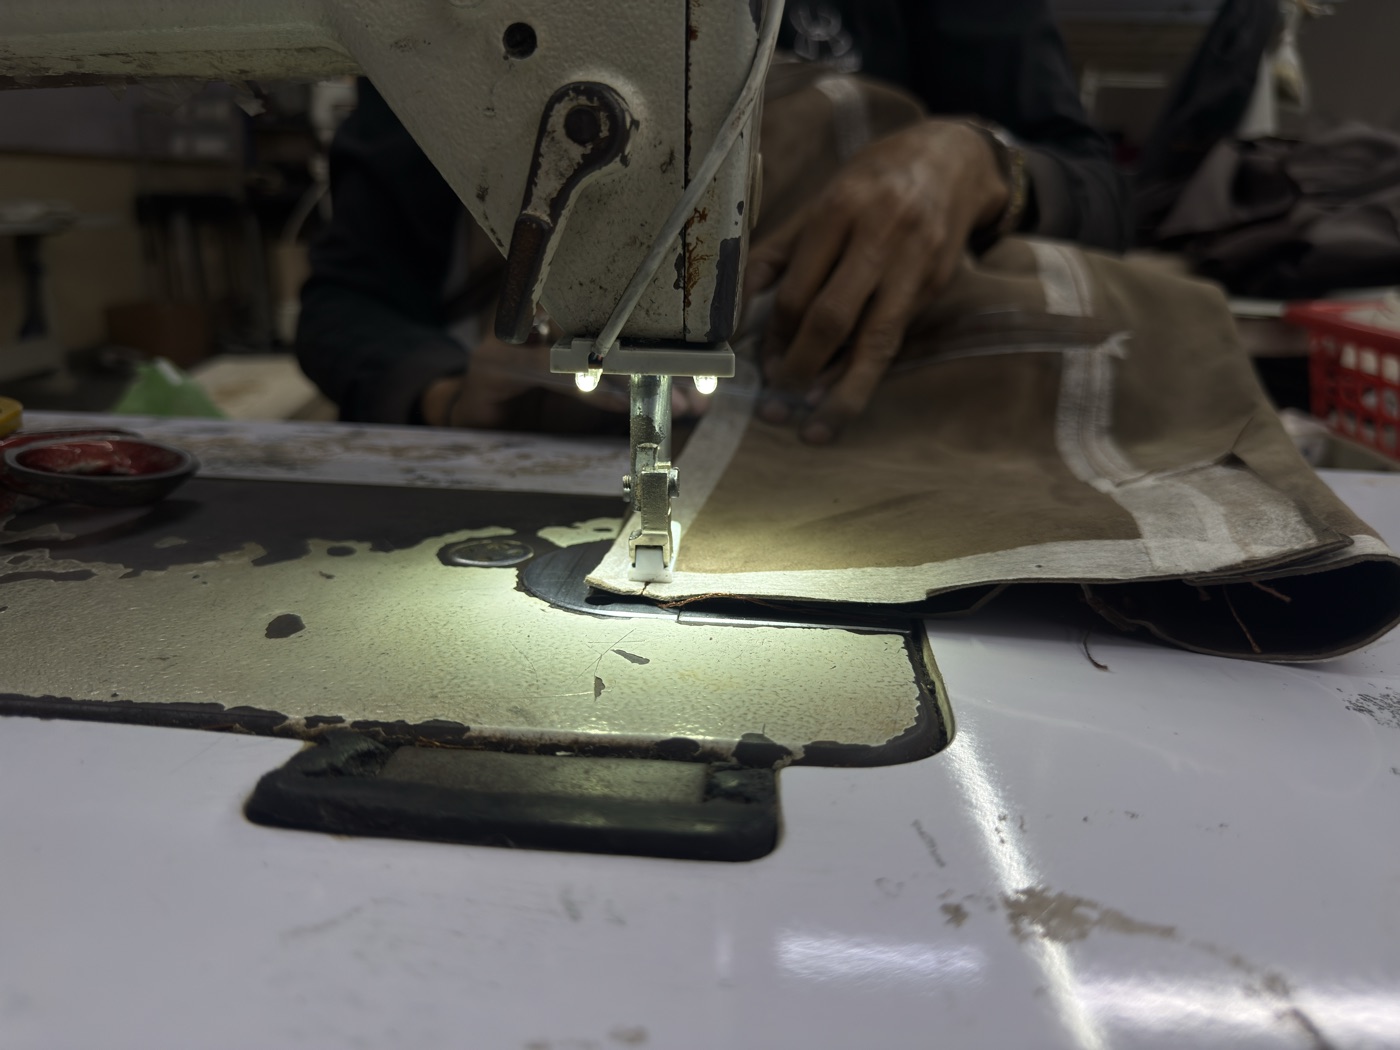
Assembly is done on industrial sewing machines fitted with heavier needles, bonded nylon or polyester thread, and walking-foot or roller-foot mechanisms that feed the leather smoothly without marking it. A typical assembly sequence:
- Construct the front panels: attach pocket bags, welt pockets, zipper guards, and decorative elements.
- Join front panels to back panel at side seams and shoulder seams.
- Construct and attach the collar.
- Set the sleeves into the armholes.
- Install the main zipper or button placket.
- Assemble the lining separately, then attach it to the shell.
- Finish the hem, cuffs, and remaining details.
A single leather jacket requires approximately 4 to 8 hours of stitching time, depending on complexity. A minimalist bomber with two pockets and a centre zip is at the lower end. A double-rider biker with asymmetric zip, four zippered pockets, epaulets, belt, and quilted lining panels is at the higher end.
Step 11: Hardware installation
Zippers, snaps, rivets, D-rings, and buckles are installed after the main stitching. We use YKK zippers as standard. For private label orders, we can source custom-branded zip pulls, engraved snaps, and embossed hardware. Installation uses hand-operated or pneumatic press machines to set hardware flush and secure.
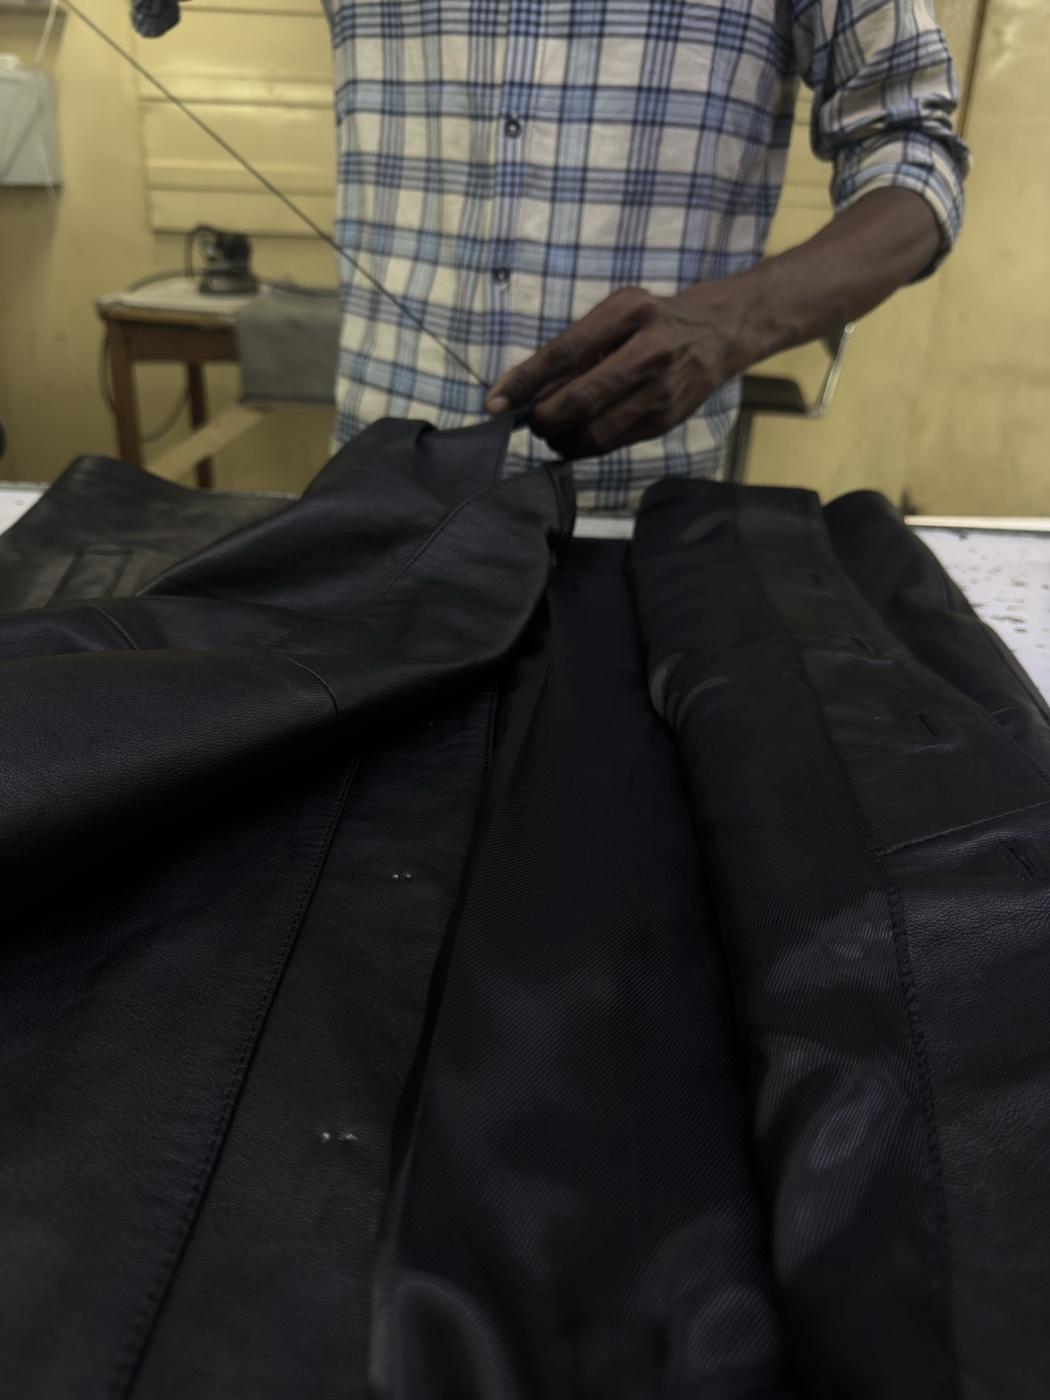
Step 12: Finishing and conditioning
- Trimming all loose threads
- Edge painting or burnishing exposed raw edges
- Light conditioning treatment to enhance the leather’s sheen and hand-feel
- Pressing or steaming the lining to remove wrinkles
- Applying final branding: heat-stamped logos, embossed marks, or printed labels
Step 13: Quality control
Every jacket passes through a multi-point QC inspection before it is approved for packing. Our checklist includes:
- Measurements: Compared against the approved size chart, with a tolerance of +/- 1 cm per measurement point.
- Stitch quality: Consistent stitch length (typically 7 to 8 stitches per inch for leather), no skipped stitches, no puckering, no loose threads.
- Leather quality: No visible defects, scratches, or colour inconsistencies on exterior panels.
- Hardware function: All zippers glide smoothly in both directions, snaps engage and release correctly.
- Lining: No bunching, twisting, or loose attachment points.
- Symmetry and alignment: Pockets match, collar is centred, sleeve lengths are even.
Jackets that fail any checkpoint are returned for rework. Only fully approved pieces move to packing.
Step 14: Packing and shipping
Approved jackets are individually wrapped in acid-free tissue paper, placed in poly bags, and packed into export-grade cartons. We include all brand-specific packaging materials: hangtags, care labels, dust bags, and any custom inserts the buyer provides. Standard shipping timelines from Karachi:
- Sea freight to Europe: 20 to 30 days
- Sea freight to North America: 25 to 35 days
- Air freight globally: 3 to 7 days
What are the real timelines from enquiry to delivery?
Here is the full timeline a typical order follows, based on our actual production schedule:
| Stage | Duration |
|---|---|
| Design and tech pack finalisation | 3 – 7 days |
| Sample production | 7 – 10 days |
| Sample approval and revisions | 5 – 14 days (depends on buyer) |
| Leather sourcing and preparation | 3 – 7 days (from tannery stock) or 2 – 4 weeks (custom colour/finish) |
| Bulk production | 4 – 6 weeks |
| Sea freight to Europe | 20 – 30 days |
Total lead time from first contact to delivery at your warehouse: approximately 10 to 16 weeks, assuming no delays in sample approval.
What questions should you ask your manufacturer about the process?
Understanding the manufacturing process allows you to ask the right questions when evaluating a leather jacket manufacturer:
- Do you hand-cut or die-cut? (Hand cutting is more flexible; die cutting is more consistent at volume.)
- Do you skive edges? (If they do not know what this means, walk away.)
- What is your QC process? How many inspection points?
- What brand of zippers do you use? (YKK is the industry standard.)
- Can I receive photo documentation during production?
- Where do you source your leather? Can I visit the tannery?
We welcome these questions. We also welcome factory visits and provide photo documentation at every stage of production. The more you understand the process, the more confidence you will have in the final product.
Ready to start production on your next leather jacket order? Get in touch with our production team to discuss your design, request samples, and receive a detailed production timeline. Email: info@macleatherco.com | UK: +44 7733 077 341 | Pakistan: +92 332 2121 282